Katie's Nappy Cake
Me: "Hmmm, I've got diapers, wipes, stuffed animals, and bottles. What I really need is a pacifier." (to shop attendant) "Excuse me, where are your pacifiers?"
Shop attendant: "Uh, I don't think we have any pacifiers."
Me: "You must have pacifiers."
Shop attendant: "Uh, I really don't think we have pacifiers."
Me: "Seriously? You have this huge baby section and you don't have pacifiers?"
Shop attendant: "Oh, are they for babies?"
Me (adopting a explaining-something-simple-to-a-toddler kinda voice): "Yes. Pacifiers are for babies. A pa-ci-f-ier. The thing you stick in their mouth when they're crying. They suck on them... You know.... A pacifier."
Shop attendant: "Oh! Do you mean a dummy?"
Sure enough, I did.
But I can't help being a bit exasperated. Dummy, Australia? You're calling a good old-fashioned pacifier a dummy? I like a lot of the names Australia has for baby stuff-- our stroller is a pram, which is not only shorter (why waste your time with that extra syllable) but also sounds rather chic. Diapers become nappies. Somehow 'dirty nappy' sounds a good bit cleaner than 'dirty diaper'. But dummy is a word I don't particularly care for. My children will be sucking on pacifiers, Thank You Very Much.
Anyway, cultural misunderstandings aside, I got all my materials and made my nappy cake! Here's what I used (and what you will need, if ever you decide to make one too):
- 72 nappies/ diapers (use smaller sizes so Mom can use them when baby is born)
- 2 large bottles
- curling ribbon to hold things together
- decorative ribbon for finishing touches
- rubber bands
- a cake plate or cardboard
- decorations (I used bibs, a burb cloth, socks, baby face washers, baby powder, several kinds of travel sized wipes, lotion, pacifiers/ dummies and stuffed animals)
And here's how you do it:
1. Wrap each diaper tightly and secure with a rubber band (this is the most time consuming part)
2. Using the bottle as a base, arrange the nappies around it in a circle so that you have your inner ring. Secure with curling ribbon and carefully remove the rubber bands once secured (or leave them; it probably doesn't matter). Repeat until you have at least 3 rings.
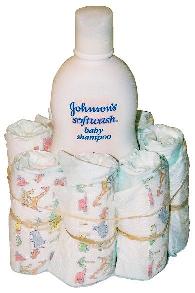
I stole this picture from the internet.
From http://www.plan-the-perfect-baby-shower.com/diaper-cake.html
3. Once you have at least three rings, you've got your bottom tier made. Repeat the process to make your second tier, just create one less ring. By the time you get to your top layer, you should have a single ring of diapers around the bottle. * You will probably have to use two bottles stacked on top of each other as your base. Not a problem.
This one, too.
4. Now decorate! Add little baby items like pacifiers, socks, booties, stuffed animals, washcloths etc. You can tie them on with curling ribbon (that's what I did), tape them on, hide them in the folds of the nappies... whatever!
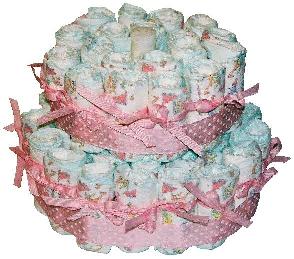
Here's how mine turned out:

The front. 6 facewashers, 2 stuffed animals, 2 pairs socks,
1 bib, one burp cloth, one pacifier, one teether and a whole lot
of string and bows.

The back (aka, the side we don't like talking
about). Not nearly as pretty to look at as the front... you
can see all the strings I used to hold everything together.
There's changing mats, baby powder, lotion, another pacifier, 2
kindsof wipes and a whole lot more ribbon on this side.
kindsof wipes and a whole lot more ribbon on this side.

Katie at her shower, with the cake.
My cake was made on Friday afternoon, and stayed together perfectly... until about 30 minutes before the shower, when the top layer fell off. That's why its leaning in the photo with Katie!
posted by Jess @ 1/29/2010 11:00:00 AM
![]()
![]()


0 Comments:
Post a Comment
Subscribe to Post Comments [Atom]
<< Home